About Me

My photo
I enjoy cooking,eating food, being creative with food, and like to try new things. I try to avoid pre-packaged foods as much as I can.

Search This Blog

Mar 28, 2012

Caesar Chicken Sandwiches

I have officially reached the "rip your hair out in stress" moment of my week. I thought it was bad on Monday and Tuesday, but this week just keeps throwing me more stuff to have done before Friday. Two of my classes gave me extra homework, and one involves having to call a client when I am on vacation. Yay. It is frustrating to have to deal with everything piling up, but I keep motivating myself by thinking of vacation. However, I think I will still have school stuff to do over vacation. Luckily, since I am completing certain work early, I am able to relax more than I would have if I stayed at school for that 4-day week. Hopefully it will all work out in the end.

I have less than 5 weeks until graduation. I am terrified. Everything is going so fast and I feel like my schedule is out of control! I am a planner naturally, but all this planning just has me super stressed. I think my eyes are feeling it too. Maybe eye strain? Too bad I don't have enough time to sleep enough and help my poor body fix itself. Another sad part of me being stressed and sleep deprived is that I get so hungry. This is not good when you are trying to have a healthier lifestyle and healthier eating habits! I know that my blog is filled with sweets and goodies, but everyone has to treat themselves once in a while. The main chunk of cookie recipes was from my cookie extravaganza during Christmas. So yea, that is life! Is anyone else having a stressful week at work or school?

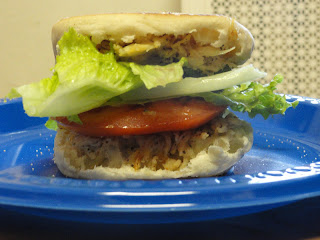
Todays recipe is something I have literally been eating every day this week for lunch and dinner. I never realized how much shredded chicken 2 lbs of chicken could make. Luckily, it is simple, delicious, and mostly healthy (especially after I add 3 huge leaves of lettuce and 2 tomato slices!). The chicken is made in the crock pot/slow cooker, then you shred it, add the assorted add ins, and then serve up the way you like. I personally enjoy it as a sandwich, but you could expand to wraps, lettuce wraps, or possibly serving it as is. I used an oil based dressing instead of creamy, but you can use whatever you prefer. Hope you like it!

Caesar Chicken Filling- Slow cooker (adapted from Sweet Treats and More)

Ingredients:

  • 2 lbs boneless, skinless chicken (whatever you have is fine)
  • 1 bottle of your favorite Caesar Dressing
                                        OR
          1 (10 oz) can of cream of chicken soup mixed with 1 packet of Caesar dressing mix
  • 1/2 cup shredded Parmesan cheese (Shred your own or buy it in the cheese section with other shredded cheeses for best results. Try not to use the green can cheese.)
  • salt and pepper, to taste
  • a pinch of dried oregano, optional
  • a pinch of dried basil, optional
  • 1/4 cup fresh chopped parsley, optional
To make your sandwich:
  • sandwich buns, bread, tortillas, etc.
  • lettuce, optional
  • tomato, optional
  • other veggies
  • any other sauces or seasonings
Instructions:

  1. Place chicken in a 3-4 quart slow cooker with 2 cups of water. Sprinkle in salt and pepper with the chicken, if desired. Cover and cook on low heat for 6-7 hours or on high for 4-5 hours.
  2. Remove chicken from cooker using a slotted spoon.  Place on a cutting board and pull chicken into shreds.
  3. Pour the dressing (or cream of chicken plus dressing packet), Parmesan cheese, parsley, and pepper over the top. Stir until mixed evenly. Cover and cook on high heat for 30-35 minutes or until mixture is hot, if you want. 
  4. Spoon 1/4 cup mixture onto your sandwich or wrap and top with desired toppings. 
  5. Eat and enjoy!
I hope you try this simple recipe! I find it delicious! You could even freeze individual portions to make meals easier later! 

Love it? Hate it? Want to make it? Let me know what you think with a comment below!


As always...
Bon appétit!

"Poverty Meal"

This past week was filled with ups and downs. I worked the business expo, which was sort of fun. I found out that the new cupcake company is not as great as it could be. I think that personalized baking and cooking is really key, especially because many desserts are too sweet. I also found out that I am a semifinalist for a scholarship competition. I have to get my friends and family to vote and get in the top 3 out of 8 contestants. It is a chance for me to win a good chunk of change that could really help pay tuition. I am hoping for the best!

This week has been stressful, yet exciting. I have 4 papers due this week, extra homework, and some organization president stuff to work on. I still have at least 10 different e-mails to send out. Ugh. It seems my time is mostly planned out. However, I took time to relax after my long day including: class, my senior assessment exam for english, and a visit to the local animal shelter to interview 3 different people. When I returned to my room, it was 4 pm and I was just burnt out. I watched the movie Have you heard of the Morgans? and jotted down a few other movies that I wish to see. I watched a bit of TV while dozing on my bed and just overall relaxed. I desperately needed that time to just chill. I feel much more level headed about the rest of this week. I am hoping to post one to three more times this week, since I've been slacking lately.

I cut up six kiwi and six bananas today so I could put them in my freezer. I absolutely adore smoothies now. I keep taking my fresh fruit and putting it in the freezer to make it last longer and to allow myself to make smoothies from it. My latest creation contained 3 frozen strawberries, a handful of frozen blueberries, a chunk of frozen spinach, and a good splash of Silk Fruit and Protein- Mixed Berry flavor. I like how Silk can instantly add protein to my smoothies! I should experiment with different healthy ingredients and see what else I could live with. I never even knew spinach would be alright until I tried it. First time for everything!

I will be gone on vacation for a week, though. My internet time will be rare and any internet time I have will need to be devoted to completing school work and keeping up with e-mails. Just a heads up! Hopefully my dorm won't be a roasting pot when I return like last time...

The recipe for today was quick to whip up, but we didn't have ground beef on hand. I used sausage and it turned out alright, but I felt it lacked flavor. I think this dish needs a bit more spice, and flavor boosters to make it absolutely delicious. I invite you all to experiment with the basic recipe and make it all your own! Next time I will add in basil, a bit of parsley, and maybe more garlic and onion.

"Poverty Meal" (from Food.com)

Ingredients:


  • 1 large onion , chopped
  • 2 garlic cloves , minced
  • 1 Tbsp. olive oil
  • 1 lb ground beef , browned and drained
  • 2 (16 oz) cans stewed tomatoes
  • 1 (16 oz) can water (fill the empty can from the tomatoes!)
  • 8 ounces elbow macaroni , uncooked
  • salt , to taste
  • pepper , to taste
  • parmesan cheese (optional)
  • other cheeses to top (optional)
Instructions:

  1. Saute the onions in a pan with olive oil until translucent. Add in the garlic and saute for about 3 minutes more.
  2. Brown the ground beef in a pan and then drain off the fat.
  3. Add the ground beef, the saute mix of onions and garlic, the tomatoes (juice and all), water, salt, pepper, and pasta into a large pot.
  4. Bring to a boil.
  5. Reduce the heat down to medium and cook for 15 - 20 minutes or until the pasta is tender. 
  6. If desired, top with cheese.
  7. Serve and enjoy!
The recipe suggests serving this dish with crusty bread and a salad. It is like Italian night that is simplified. As I said, make sure you add herbs and spices till it tastes right to you! Hope you enjoy! 

Love it? Hate it? Want to make it? Let me know what you think with a comment below!


As always...
Bon appétit!

Mar 20, 2012

Strawberry Scones

I wanted to thank all of my readers for sticking with me through all the ups and downs of my post frequency. It means the world to me that you still read my blog. :)

Life is throwing me curve balls lately. Recently, it threw at me a project partner who likes to leave things to the last minute. On top of that, he was late for our class in which we had a partner presentation. I am not happy with this individual. Also, the slides were all messed up and some looked super crappy. I felt the most prepared out of both of us. Hopefully our group grade will be alright. I am crossing my fingers and hoping for the best. It was a rough presentation, but we still have the paper to write. Should be interesting. These problems are the reasons I hate out of class projects. Frustration major.

In other news, I am planning more stuff for the student organization I am president of and I am working on some PR stuff for Relay for Life. I am also trying to figure out my future. With all of this and school, I'd say I am going to be busy. Hopefully it will all be worth it! At least baking and cooking are still there to help me get through the stress. It is odd how I can just focus on baking and cooking and reach a peaceful place.

The weather here is absolutely gorgeous. Other than the thunderstorms that we had, the weather is warm, breezy, and sunny for the most part. That reminds me... happy first day of spring! The blossoms on the tree outside of my window are blooming and it makes me smile. It truly is the simple things that can keep you sane sometimes. I am trying to take it day by day and absorb as much as I can with the time I have left.

With spring happening, summer is only a short season away. I absolutely love strawberries in the summertime, so this would be a lovely repeat recipe when strawberries are at their peak of tastiness. I adore scones and strawberries, so these were a perfect marriage for me. The only thing I regret is the orange zest. I have learned that I can do without the zest. I will exclude it next time. Anyone who is strongly against the orange zest flavor can leave that ingredient out.

Strawberry Scones (adapted from Annie's Eats)


Ingredients:

  • 1 large egg
  • 1/4 cup plain or vanilla yogurt (I used greek yogurt because that was what we had in the house)
  • 1/2 cup milk
  • 1 tsp. orange or lemon zest, optional
  • 2 1/4 cups all-purpose flour
  • 1/4 cup sugar, and more for sprinkling
  • 1 Tbsp. baking powder
  • 1/2 tsp. salt
  • 8 Tbsp. cold, unsalted butter, cut into small pieces (I put my butter in the freezer and then used it.)
  • 1 heaping cup of fresh, diced strawberries
Instructions:
  1. Preheat your oven to 425 F or 220 C.
  2. In a small bowl, whisk together the egg, yogurt, milk, and citrus zest (if you are using it) until well blended. Set aside.
  3. In another bowl, combine the flour, sugar, baking powder, and salt. Mix and then add in the cold butter. Use a pastry blender or two forks to blend the butter with the dry ingredients. The butter should be approximately pea-sized chunks when you are done.
  4. Add the strawberries to the flour mix. Toss the strawberries so they are coated with the flour mix. 
  5. Add the wet ingredients to the dry ingredients/butter bowl. 
  6. Mix together until a sticky dough has formed. If absolutely needed, add milk 1 Tbsp. at a time to hydrate remaining ingredients. (I didn't have to add anything extra.)
  7. Lay out some wax paper on a flat surface and sprinkle flour over it. (This prevents a messy countertop. You can skip the wax paper if you wish. I found it helpful to lift the scones off though.)
  8. Knead the dough a few times. (Basically squish it with you hands in the bowl. Make sure you flour your hands first!)
  9. Transfer the dough to your well-floured work surface. Pat into a disk about 7 or 8 inches in diameter.
  10. Cut the disk into 8 wedges. Sprinkle with sugar.
  11. Line a baking sheet with parchment paper or a silicone baking mat. (I need to get one of those baking mats!)
  12. Place the scones on the cookie sheet and bake until lightly brown on the top, approximately 15 minutes.
  13. Let the scones cool a few minutes before serving. 
  14. Eat and enjoy!
These scones went fast! So easy and yummy. Be warned, you will get messy fingers from kneading the dough since it is sticky. I didn't mind. :)

Love it? Hate it? Want to make it? Let me know what you think with a comment below!

As always...
Bon appétit!

Mar 17, 2012

Microwave cheese sauce

I am back! The last two weeks have been a bit crazy. My grandpa ran into some issues, so I had to run the house while on my spring break. Coming back to school was nutty, especially since my sleep schedule was messed up royally. I have finally reeled everything in and am now back to semi-decent schedule. I was happy to have a cancelled class today, because it gave me more time to myself. The weather has been absolutely gorgeous lately. However, the school seems to think the heating still needs to be on. I don't understand it.

Another thing that I realized today is I am 7 weeks from graduation. Eek! It's scary yet exciting, and I know I need to get going on my resume by going to Career Services so they can help me out. I watched a new series called Fairly Legal. It's interesting and I like it so far. I've been watching movies lately and am trying to shrink my "want to watch" list down quite a bit. We'll see how well I do.

Even though life is throwing curve balls at me, I still have found time to cook and create new stuff. The recipe today is a simple cheese sauce that can be made in the microwave. I used this cheese sauce to make my cheesy corn dish. This sauce could be used over anything that you want cheese sauce on, really. I hope you like it!

Microwave Cheese Sauce (recipe from Food.com)

Ingredients:

  • 2 Tbsp. butter
  • 2 Tbsp. flour
  • 1 cup warm milk
  • 1 cup shredded Cheddar cheese
  • 1/2 tsp. salt, optional
Instructions:

  1. In a large microwaveable glass bowl, heat the butter for 30 seconds. Stir and then microwave in 10 second intervals until melted.
  2. Add the flour to the melted butter and whisk well.
  3. Add in the warm milk and whisk again. 
  4. Add in the cheese.
  5. Place the bowl back into the microwave. Heat for a total of 1.5 - 2 minutes, but whisk after 30 seconds. (3-4 sets of 30 seconds)
  6. The sauce should be thick and heated through.
  7. Add the salt if you want to and whisk until blended.
  8. Pour over what you wish and serve.
I hope you all enjoy this simple recipe for cheese sauce. It is a plus that it's made in the microwave. The taste of this cheese sauce is decent and is versatile for whatever mix ins you might want to have. Hope you try this out!

Love it? Hate it? Want to make it? Let me know what you think with a comment below!

As always...
Bon appétit!

Mar 5, 2012

Rice Dish

I am slowly recovering on my spring break. I truly needed this time away from school! Ugh, midterms! So stressful and frustrating. I survived though! I am now on spring break and enjoying it. However, I went to the dentist today and I have cavities. :( Boo! Did you know that genetics can play a role in cavities? Weird. I don't drink soda anymore and I don't really drink many sugary drinks, so I was really sad when I found out. Ah well. Get to visit the dentist two more times this week to get those taken care of. At least they aren't big cavities. : /

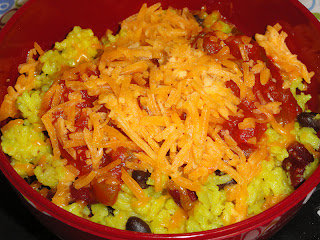
Today's recipe is something that I whipped together from some items in my pantry and fridge. I was low on groceries, so this was easy to make and had easy ingredients to find too. I hope you will enjoy this as much as I did!

Yellow Rice, Salsa, Beans, and Cheese 


Ingredients:

  • 2 cups of cooked yellow rice 
  • 1 can of Black beans
  • 1 can of kidney beans
  • A couple TBSP of salsa
  • 1/2 cup (or more to taste) of shredded cheese
Instructions:

  1. Make the rice according to the directions. Make both packets at one time.
  2. Open the cans of beans.
  3. Drain the black beans and the kidney beans. Rinse them well. 
  4. Once the rice is done, add the beans, the cheese, and the salsa. Taste to make sure it is right for you.
  5. Heat in microwave for up to 1 minute if needed.
  6. Enjoy!
I like this dish because it is meatless and filling. I love it when I need a bit of a mexican flair to my food.

Love it? Hate it? Want to make it? Let me know what you think with a comment below!


As always...
Bon appétit!