About Me

My photo
I enjoy cooking,eating food, being creative with food, and like to try new things. I try to avoid pre-packaged foods as much as I can.

Search This Blog

Jul 23, 2013

Italian Cream Cake

I decided to write this post while the thunderstorm dumps plenty of rain on the plants and lawn. When I was thinking about dinner (we're having chicken fried rice), I started to think about Thai Stick. Thai Stick is a lovely Thai restaurant in San Francisco that we accidentally discovered while attempting to locate a different Thai restaurant. The location we went to (on Post Street) has been there since 1988! Even though it wasn't our intended Thai restaurant, it was wonderful. The service wasn't as snappy as it might be in other restaurants, but the food was delightful. I had the pineapple fried rice. It was so delicious! I could have eaten that multiple nights in a row and still been content. I only have one warning about this restaurant... you get oodles of food. You could probably take 1/2 your meal home with you if you are able to. Otherwise, bring your hunger or split a meal with someone. So, if you are ever in or around San Francisco, I encourage you to stop at the restaurant Thai Stick (they have 4 locations). 

Now that I have that restaurant recommendation out of the way, let's talk about Italian Cream Cake. First of all, this cake isn't a cake made out of cream or a plain cake. Instead, it is a lovely combination of pecans and coconut in a white cake that is moist and oh so delicious. To top it off, it is frosted with a dreamy cream cheese frosting. Mmmm. You might think I am exaggerating, but it was just that good! 

I love coconut and pecans, so it was a perfect combination for the birthday cake that I wanted to make for my birthday but ran out of time and instead made Molten Mocha Cake. Just so you know, that was delicious too! I ended up having two types of cake that were both wonderful and were both for my birthday (even if this one was made a week or so after my birthday :P). No matter what the occasion is or isn't (you don't need a special occasion for this cake!), this cake is perfect for anyone who loves pecans, coconut, and cream cheese frosting.

I didn't change anything in this recipe, but I did have one layer of the cake that didn't want to leave the pan. I still made it look ok after frosting it. See the oopsie?:

oops


Italian Cream Cake (from BHG)


Cake Ingredients:
  • 5 eggs, separated into yolks and whites (learn how here) 
  • 1/2 cup butter
  • 2 cups all purpose flour (plain flour)
  • 1 tsp. baking soda
  • 1/2 cup shortening
  • 2 cups granulated sugar
  • 1 or 2 tsp. vanilla extract (or vanilla bean paste)
  • 1 cup buttermilk
  • 1 cup flaked coconut (mine was sweetened and worked well, but unsweetened could work too)
  • 1/2 cup finely chopped pecans (I didn't toast mine, but feel free to toast them if you want to.)
Cream Cheese Frosting Ingredients:
  • 8 oz cream cheese, softened
  • 1/2 cup butter, softened 
  • 2 tsp. vanilla (vanilla extract or vanilla bean paste)
  • 5 and 1/2 - 4 cups of powdered sugar (also called confectioners' sugar or icing sugar)
Instructions:
  1. Allow the egg yolks, egg whites, and butter to sit at room temperature for 30 minutes.
  2. Grease and lightly flour two or three 8 X 1.5 inch or 9 x 1.5 inch cake pans. (We only own two, so I made mine a 2 layer cake instead of three.) As another option, you could also liberally spray the pans with cooking/baking spray. (I did this and had one disaster and one perfect layer, so do this at your own risk! See above photo!) Set the pans to the side and preheat your oven to 350 F (180 C).
  3. In a small bowl, mix together the flour and baking soda. 
  4. In a large mixing bowl, beat the butter and shortening with an electric mixer on medium or high speed for 30 seconds. Add the sugar and mix until well combined. Next, add the egg yolks and vanilla. Beat on medium speed until well combined. 
  5. Alternate between adding the flour mix and buttermilk into the butter mix. Beat on low speed after each addition only till combined. 
  6. Fold the coconut and almonds into the mixture. I suggest folding these in with a spatula and not the mixer.
  7. Clean the beaters or get out a new set of beaters. 
  8. In a different bowl, beat the egg whites until stiff peaks form. The egg tips will stand straight.
  9. Carefully fold 1/3 of the egg whites into the batter. Fold in the remaining beaten egg whites.
  10. Divide the batter evenly into all 3 pans. Spread the batter evenly in the pans.
  11. Bake approximately 25 minutes for 9 inch pans, 35 minutes for 8 inch pans, or until a wooden toothpick inserted near the center comes out clean.
  12. Once the cakes are done, let them cool in the pans on a cooling rack for 10 minutes.
  13. Remove the cake from the pans and let it cool completely;this should take approximately 2 hours.
  14. While the cake is cooling, prepare your frosting. In a mixing bowl, beat the cream cheese, butter, and vanilla on medium speed until light and fluffy. Gradually beat in the powdered sugar until it is well combined and a spreadable consistency.
  15. Once cooled, place one cake layer (bottom side up) on a serving plate. Spread with approximately 1/2 cup of the frosting and sprinkle with 1/4 cup of pecans. Top with the next layer (bottom side down) and spread with more frosting. If you have 3 layers, add the nuts on the second tier as well and then top with the last layer (bottom side up). 
  16. Spread frosting on the sides and top of the cake. If desired, press nuts on the sides and sprinkle coconut on the top or decorate in whatever way you want to. 
  17. After all of that mixing and baking, enjoy your cake! 
I know this seems intimidating, especially since it has 16 steps. The recipe basically comes down to a lot of measuring and mixing. Once you have those two parts finished, it is a piece of cake to make (haha, punny). Feel free to try this out. Let me know what you think! 

Have you ever eaten Italian Cream Cake before? What did you think? Let me know with a comment below! 

Love it? Hate it? Want to make it? Comment and let me know what sort of recipes you want to see next!

As always...

Bon appétit!


Follow me on Pinterest.
Follow me on Facebook. 

Jul 10, 2013

Tonga Toast: Rainforest Cafe

#####NOTE:  If you are/know someone who is in the military then please keep reading. You/the military person you know can get a FREE pass to all of the national parks. Go to: http://www.nps.gov/findapark/passes.htm for more details! #####

Well... we survived our 2 week road trip family vacation. No one lost a limb or fell off a cliff, which is always good. Mom did hurt her knee, but otherwise we had very minor "injuries" (bug bites, scrapes, etc.). Our two week road trip of crazy proportions included Yellowstone National Park, Yosemite National Park, San Francisco, Monterey Bay Aquarium, San Diego, Grand Canyon National Park, and the Petrified Forest National Park. We got to see a lot of nature, hike, eat fabulous food, and relax (well... at least a tiny bit). I have included a few pictures from our trip below.

Cistern Spring, Yellowstone
Yosemite Chapel
San Francisco Pier 39


Petrified Forest National Park


Grand Canyon


It was a trip of pictures and fun memories. I took 2,030 photos! Wow! It was also memorable for some not so fabulous reasons... We had plenty of moments where we honestly needed to be on a comedy show. Our soft top carrier ripped on day 3 of the trip and we replaced it with a hard top carrier. The reviews of the soft carrier included a guy saying "Day 1: Turned into a kiddie swimming pool. Day 2: Plastic started to flake off. Day 3: Seams ripping and pulling apart. Threw it away in the motel trash can and replaced it." He continued by saying that his other carrier was lasting much longer. Oops... we should have read the reviews before buying! We laughed about it  later when we weren't squished by duffle bags. It is one of those vacation stories that we will probably tell over and over.

Anyway... that is why I haven't posted in a little over two weeks. It also took me a day or so to adjust back from the 3 time zones that we crossed. Yikes. Luckily it wasn't as bad as the jet lag feeling that I felt after coming from Scotland.

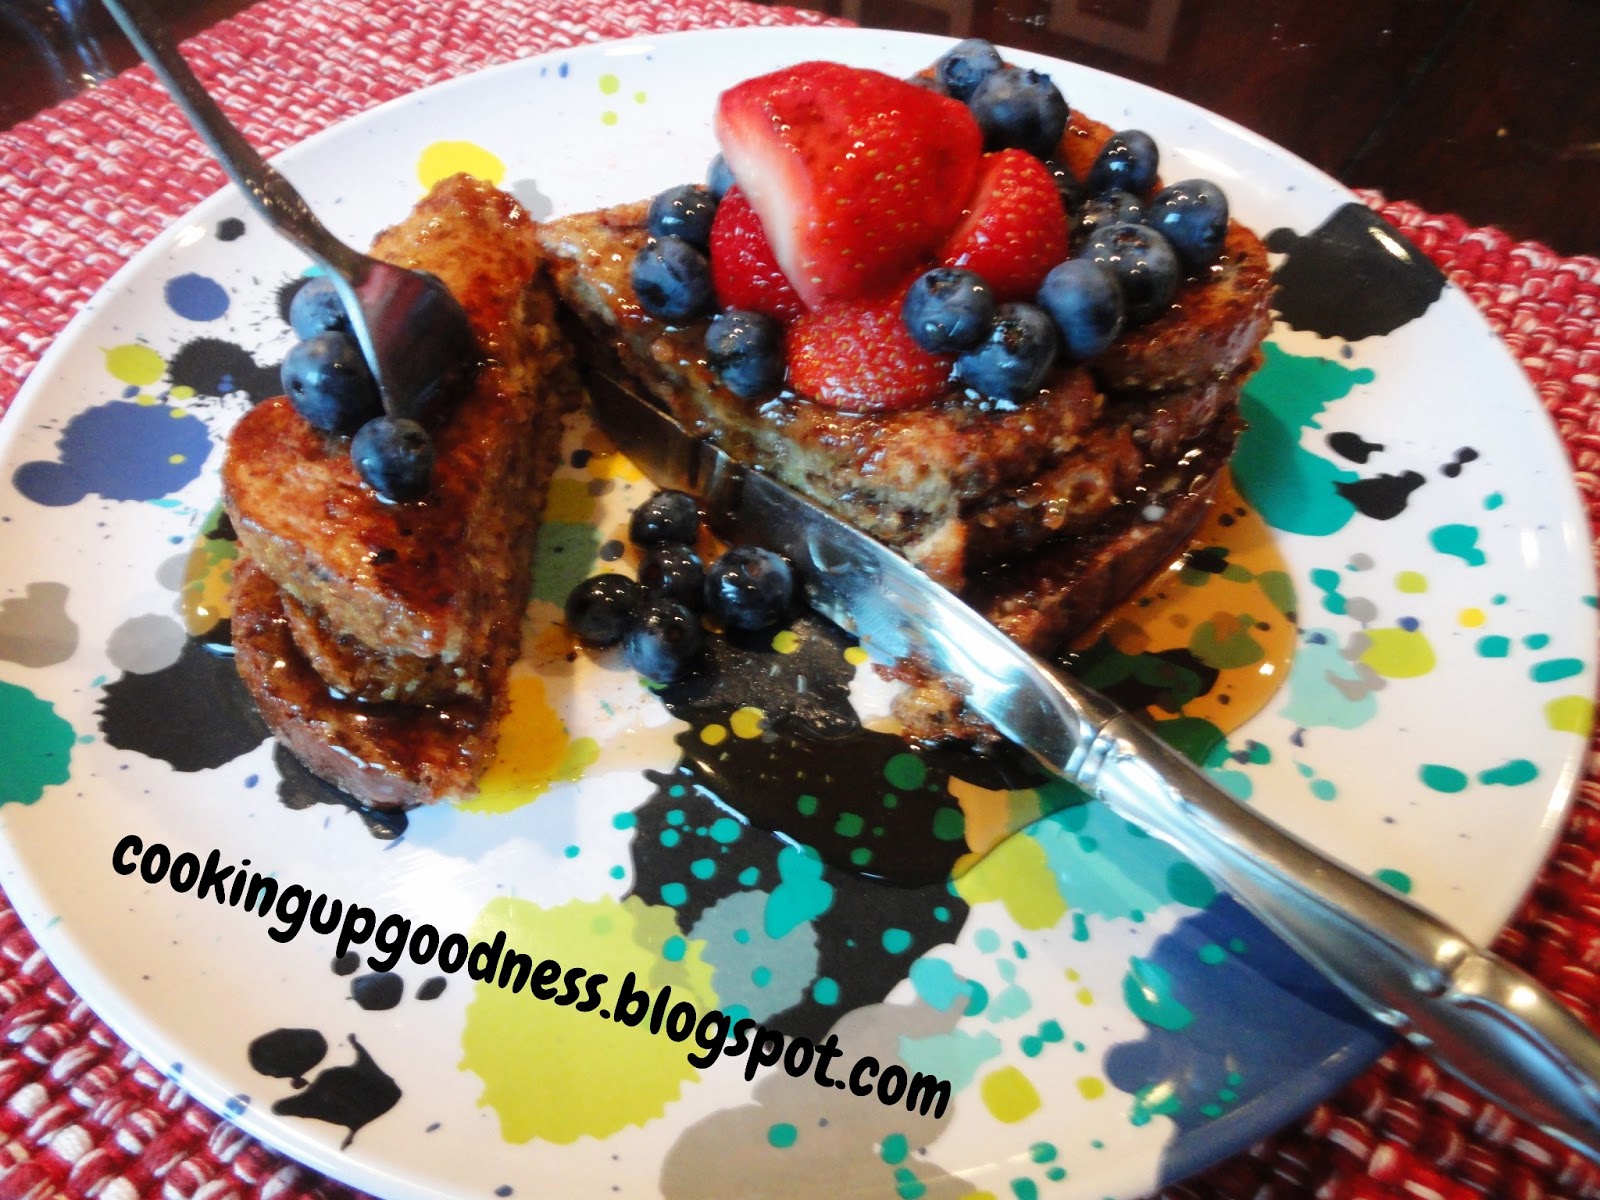
I was perusing my un-blogged recipe food photos after vacation and this one caught my eye. I can honestly say that this is a huge hit in our house. I tried Tonga Toast at the Rainforest Cafe during a band trip and I never forgot it. I was so happy to find a recipe so I could try and recreate the dish at home. I don't think it is exactly the same, but it's definitely delicious! This is now my go to recipe for french toast. I hope you try it out!

Tonga Toast: Rainforest Cafe (Food.com)

Ingredients: 
  • 4 slices of white bread about 1 inch thick* (I used organic flax seed sandwich bread and it worked fine. I did use more than 4 slices though.)
  • 1/3 cup granulated sugar
  • 1 tsp. cinnamon
  • 1/4 tsp. nutmeg
  • 1 large egg
  • 1/4 cup white milk** (any kind)
  • 1/2 tsp. or 1 tsp. vanilla extract
  • desired toppings (fruit, syrup, butter, nuts, honey, etc.)
Instructions:
  1. In a medium bowl, beat together the eggs, sugar, cinnamon, nutmeg, milk, and vanilla extract.
  2. Preheat your frying pan on medium heat. Add a little butter to help prevent the french toast sticking.
  3. Dunk a slice of bread into the mixture, making sure it is completely coated on both sides. 
  4. Place the dunked bread into the pan. 
  5. Cook until lightly browned on both sides. 
  6. Once cooked, remove from the pan and continue steps 3 - 6 until all slices of bread are used.
  7. Top with your desired toppings and enjoy! 
* You can use Gluten Free Bread to make this gluten free.
** You could also use almond, soy, or another dairy alternative.

I hope you try this recipe. It is delicious with bananas, berries, or peaches! It is a great addition to a breakfast spread, delicious by itself, and it freezes wonderfully. I take whatever leftover tonga toast we have, put it in a gallon size bag and put it in the freezer. We take out what we want for breakfast and it still tastes delicious. Nothing beats fresh out of the pan tonga toast
though! 


Have you ever eaten breakfast at the Rainforest Cafe? Let me know what you thought with a comment below!

Love it? Hate it? Want to make it? Comment and let me know what sort of recipes you want to see next!

As always...

Bon appétit!

Jun 23, 2013

Ooey Gooey Grilled Mozzarella Sandwich

I seem to have a love for mozzarella cheese. It can be a bit expensive to buy the fresh mozzarella that melts deliciously, but I think it is worth every penny. I could probably buy stock in mozzarella because I love it so much. It is just so delicious!

Today I have taken mozzarella to a place that not all people use mozzarella. Yes, mozzarella makes a great pizza topping, but it has many other uses. The great thing about using mozzarella in your grilled cheese is that it melts to make the stringy and cheesy sandwich that you normally only obtain with super thin slices of cheese or processed cheese slices. Nom nom. 


Hopefully by now I have convinced you of the deliciousness of mozzarella and that you want to try this recipe! This sandwich is just as easy as the normal grilled cheese.

Ooey Gooey Grilled Mozzarella Cheese Sandwich

Ingredients:
  • 2 slices of bread, a pita pocket, or gluten-free bread
  • Butter (to spread on the bread/pita pocket)
  • Fresh Mozzarella cheese
Instructions:
  1. Spread a thin layer of butter on 1 side of each slice of bread.
  2. Place one slice (butter side down) into the pan.
  3. Add your mozzarella on the bread and top with the other slice.
  4. Cook in your pan until the bread is somewhat browned and the cheese is melting. You will need to flip the sandwich once so that both sides are cooked. 
  5. Serve and enjoy!
I served my sandwich with a side of tomatoes. If you like tomatoes, this is a delicious combination! I hope you try this!

Have you ever made a grilled cheese sandwich with mozzarella?

Love it? Hate it? Want to make it? Let me know what you think with a comment below!

As always...

Bon appétit!

Jun 17, 2013

Hootenanny (Oven Pancake): Simple Breakfast

*** If you are reading this blog for the first time, then welcome! Please feel free to subscribe to the posts via email or on your blogger ID. I always welcome new readers! :) ***

We started volunteering at a local, mostly-no-kill shelter. Yesterday we had the chance to play with kitties and kittens after we cleaned up their kennels and rooms. It smelled at the start, but it could've been much worse. Since we can't have a cat at home, this is the next best thing. We did have one escapee who just wanted someone to hold her and snuggle. So cute! ^.^ We get trained how to work with the dogs today! It should be a fun experience. :)

I looked at how long it has been since I blogged and well, it seems about the usual sort of deal. Life gets in the way sometimes. I give a lot of kudos to people who blog every day. It can be almost like a job sometimes, because you really don't feel like writing some days. Maybe that is just my problem, but I hope others have experienced that as well. No matter how much I love food, I cannot always bring myself to type up a post and fix the photos. Maybe it is me being lazy, but perhaps it is one of those strange "Writer's Block" moments...

Anywho... I have noticed a trend in my last three posts... they all involve muffin tins! Don't believe me? Go ahead and look! I didn't really notice till I scrolled through and that similarity appeared. You will be happy to note that today's recipe doesn't involve a muffin tin. In case you thought you'd get ahead and prep your muffin tin, I am sorry, because you now need to put it away.


Today's recipe is best described as a mesh between a pancake and french toast. It is awesome with syrup, powdered sugar, or cinnamon on top of it. This recipe was a meh in our family, but I absolutely loved it. I didn't have to stand at a pan and flip a bunch of pancakes! Yea! Instead, I mixed the ingredients, dumped it in a pan, and baked it! My only complaint was that the amount of butter made this oven pancake a bit too greasy for me. I will try this again with half the butter and see what happens. I encourage you all to try it out and see if this simple recipe will pass the family taste test for you!


Hootenanny aka Oven Pancake (Food.com)

Ingredients: 

  • 1 cup all purpose flour (plain flour)
  • 1 cup milk
  • 6 eggs
  • 1/4 tsp. salt
  • 1/2 cup melted butter (I will cut this in half next time)
  • 1 tsp. cinnamon, optional
  • 1/4 tsp. nutmeg, optional
  • 1/2 tsp. vanilla, optional


Instructions:

  1. Preheat the oven to 425 F (220 C).
  2. Place the 1/2 cup of butter into a 9 x 13 pan. Pop the pan into the heating-up oven. 
  3. Beat the eggs, milk, and salt together until frothy. 
  4. Add your flour to the egg/milk/salt mixture and beat until well mixed. 
  5. Take your pan out of the oven and pour the mix over the melted butter. 
  6. Put the pan back into the oven and bake for 25 - 30 minutes.
  7. Serve with maple syrup, powdered sugar, berries, or any other topping of choice. Enjoy!


We served this with scrambled eggs, sausage links, and lots of oranges. We had mandarin oranges (from a can), fresh Ugli Fruit, and fresh Blood Oranges. It made a delicious breakfast! 


Have you heard of Hootenanny before? I sure hadn't! 

Love it? Hate it? Want to make it? Let me know what you think with a comment below!

As always...

Bon appétit!