About Me

My photo
I enjoy cooking,eating food, being creative with food, and like to try new things. I try to avoid pre-packaged foods as much as I can.

Search This Blog

Feb 28, 2013

Cheesy Quinoa Bites

I am quite sad today because as of March 1st, Kroger isn't doubling coupons anymore. Boo! We will adjust and have to really consider if the deal is worth it without the double coupon savings. They say it is because they have lower prices and many speculate that it is also an attempt to shoo extreme couponers. I don't see all of the Kroger prices lowering... I never really thought that extreme couponers were really that popular, either. Hmm.

Recently I read this book called The School of Essential Ingredients by Erica Bauermeister. It is about a class that one character teaches. It reminded me about passion and how food made with passion tends to taste better. It also reminded me how food can cause an emotional response and that playing with your food can be acceptable when you are testing a new recipe. Overall I enjoyed the book, even though I was confused by the dividing of the book at first. Once I realized which characters were who, it started to make sense. It's a wonderful book if you ever get a chance to read it. Our local library had it, so maybe yours will too!


A little while ago, I tried out this recipe for Cheesy Quinoa Bites and decided that I wasn't a fan of the texture and taste combination. I will say that dipping the bites into the honey mustard dipping sauce did improve the taste of the quinoa bites, but not enough for me to want to eat all 30 of them. I have linked the recipe below, in case you are interested and would like to try it out. I snapped a few photos of the quinoa bites and a photo of a funny looking tomato that I found at the farmer's market. It looks like it has a nose!

Cheesy Quinoa Bites Recipe

See the nose? 


Love it? Hate it? Want to make it? Let me know what you think with a comment below!
As always...

Bon appétit!


Feb 15, 2013

Oreo Truffles/ Oreo Delights

Happy Valentine's Day! I hope you all enjoyed the day, regardless of whether you celebrate Valentine's Day or not. I personally didn't do much, but I did cook dinner, make dessert, and watch WALL-E on the Disney channel, among other assorted tasks.

The dessert I made is a no-bake dessert. It's quick, easy, and delicious! Best of all, it only has 3 ingredients, woo! Are you dancing with joy yet? Drum roll, please...

Oreo Truffles/Oreo Delights (from Kraft Recipes) 

Ingredients:
  • 1 package of oreo cookies
  • 2- 8 oz blocks of cream cheese, at room temperature
  • white chocolate coating/white chocolate chips (or any chocolate coating)
Instructions:
  1. Crush the oreos in a plastic bag with your hands or a spoon. You can also use the food processor; pulse until the cookies form chunky crumbs.
  2. Pour the oreos in a bowl and add the cream cheese. Mix till combined. 
  3. Put the bowl in the fridge for about 10 minutes.
  4. Set out your wax paper while you are waiting.
  5. Start making your desired size of balls of the mixture.
  6. Melt your chocolate according to the directions (or put it in the microwave in 30 second intervals, stirring after each time) and then dip the balls into the chocolate, covering as much or as little as you want to.
  7. Put the chocolate covered oreo blobs on the wax paper and then put them in the fridge. 
  8. Refrigerate until ready to serve.
  9. Enjoy!
Time: about 15 minutes

I decided to add food coloring and sprinkles to mine because of Valentine's day. The colors and sprinkles could be varied, or you could sprinkle crushed oreos on top. This recipe allows the use of low fat cream cheese or even non-dairy cream cheese if you need to or want to. Feel free to play with this recipe and tweak it to what you enjoy!

Love it? Hate it? Want to make it? Let me know what you think with a comment below!
As always...

Bon appétit!

Feb 11, 2013

Whole Wheat Sandwich Bread

Well, it is February! The month of love and cupid and such. I thought about posting a few different recipes, but this one's been on my mind because of how comforting and homey it feels. Here's a little update on life:

In January, we had to put down our 13 year old German Shepard. It was really sad, but I was glad that she wasn't suffering anymore. Here she is during Christmas:
Heidi
The whole family misses her, but it is getting easier. The other dog we are pet sitting distracts our thoughts somewhat. Superbowl junk food evening was good, but the power outage was a bit of a surprise! I liked the halftime show and there weren't any costume malfunctions, which is always good!

One thing I have been enjoying is couponing! My best savings happened today with a 48 percent savings (coupons and sales). It is somewhat of a rush to get good deals on items we will use. This recent shopping trip I used my coupon skills to buy food stuffs for the local pantry. I can't wait to drop it off! :)

Anywho, let's get back to the food! This bread recipe takes a bit of time, but it is worth it! I will definitely make it again, soon!

Whole Wheat Sandwich Bread (from Big Box Detox)

Ingredients:
  • 2 and 1/4 cups warm water
  • 1/3 cup maple syrup (I suggest using the real maple syrup)
  • 1/4 cup melted butter
  • 3 cups whole wheat flour
  • 1 and 1/2 tsp. salt
  • 1 and 1/2 TBSP. active dry yeast (I think I used two packets or so...)
  • 3 cups of bread flour (I used all-purpose flour and it worked)
Instructions:
  1. Combine the first three ingredients in a saucepan and heat over low heat until warmed.
  2. Combine the whole wheat flour, salt, and yeast in a bowl. 
  3. Add the warmed ingredients to the flour mixture. Stir for about a minute. 
  4. Put the dough hook on your mixer and run it on the lowest setting (or mix by hand). Slowly add in the bread flour (or all purpose) 1/2 cup at a time. You should end up with a ball of dough.
  5. Turn the mixer to the second setting and knead the dough for 2 minutes (or knead by hand). 
  6. Lightly grease a bowl and place the dough in it. Let it rise until it has doubled in size.
  7. Once it has doubled in size, take it out of the bowl and punch it down. Divide the dough into two equal chunks and shape it to fit in bread pans.
  8. Grease two bread pans and place the dough in them. 
  9. Cover each pan with a tea towel, set the pans in warm, dry place and let the dough rise for a second time. The loaves are ready when the top pops out of the pan.
  10. When the dough is ready, pre-heat the oven to 350 F (180 C).
  11. Bake the loaves for 30 minutes. 
  12. Let the pans cool for at least 20 minutes, then remove the bread and let it cool on a wire rack. 
  13. Enjoy!
I hope you get the chance to try it out! Don't be afraid of the time it takes to rise. You can easily busy yourself with something else while waiting without having to worry or fuss. 

Love it? Hate it? Want to make it? Let me know what you think with a comment below!
As always...

Bon appétit!

Jan 25, 2013

Happy 2013!

The new year is a time when many of us look back at the past year and wonder if things would be different if we made different decisions . At least I sure do . Overall, I think my year was pretty decent . I also made resolutions for 2013. I won't share them since I have broken almost all of them. Haha. Oops.

I have been meaning to post this since, well... January 1st. Twenty four days later I am finally sitting down to type this up. It's sad really. However, last week was my birthday. Another year older and hopefully another year wiser. I still am making decisions about how I want to move forward. I know I definitely want to get my Master's degree... but the path there is a bit foggy. I will figure it all out though, eventually. Job hunting should probably start soon. Anyone have any motivational quotes that could spark my interest in resume writing?
>.< I'm behind, I know... but it is how it goes.

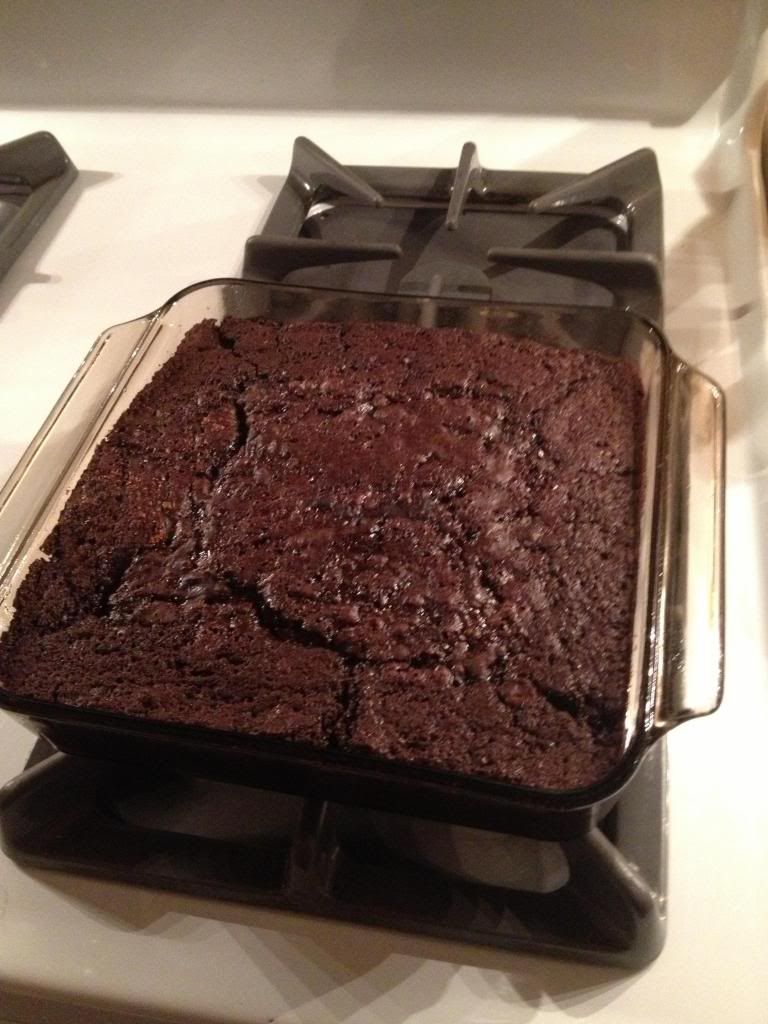
Since my birthday was last week, I wanted to post a recipe for the cake that I baked when we celebrated. This cake was the one I knew would be a hit with everyone and it was quick, so it was the only cake I had. My original plan was to have two cakes... one that I wanted and one that the family would eat, but there wasn't enough time, so only one was baked. I finally baked the cake I wanted to have yesterday, so that post is coming soon!

This cake has a crust on the top, a cakey middle, and is gooey on the bottom. I am not a fan of chocolate cake and I even liked it! Anywho, here is the recipe:

Molten Mocha Cake (from Chow.com)

Ingredients:
  • 1 cup all purpose flour (plain flour)
  • 1 cup unsweetened cocoa powder (I used Equal Exchange cocoa powder), split into 3/4 and 1/4 cup
  • 2 tsp. baking powder
  • 3/4 tsp. kosher salt
  • 3/4 cup granulated sugar (white granulated sugar), split into 1/2 and 1/4 cup
  • 1 cup whole milk
  • 4 TBSP (half a stick) melted butter, cooled slightly 
  • 1 large egg (I used a medium egg and it was fine)
  • 1 TBSP vanilla extract
  • 3/4 cup dark brown sugar
  • 1/2 to 3/4 cup strong brewed coffee, room temperature
Instructions:
  1. Heat the oven to 350 F (180 C) and arrange a rack in the middle of the oven.
  2. Butter/grease an 8 by 8 or 10 by 10  inch square pan. I used the 10 by 10 and adjusted the time a bit.
  3. Combine flour, 3/4 cup of cocoa, baking powder, 1/2 cup granulated sugar, and salt in a medium bowl, stirring to break up any lumps.
  4. Add the milk, egg, melted butter, and vanilla to the flour mix. Stir until combined. Some lumps will remain. 
  5. Pour the batter into your prepped square pan. Spread the batter out as evenly as possible.
  6. In a small bowl, combine the 1/4 cup of cocoa powder, 3/4 cup dark brown sugar, and 1/4 cup of granulated sugar. Stir until mixed well, then sprinkle over the batter in your pan.
  7. Pour the coffee over the batter. Do NOT stir. 
  8. Put the cake pan into the oven.
  9. Bake for 20 - 25 minutes or until the cake is set at the edges and a bit loose in the middle. Time can vary depending on your oven and the pan you used. Use your best judgement and remember that the cake will set a little more in the middle once it cools. 
  10. Let the cake cool for 5 minutes before serving.
Servings: 5 - 8 

I hope you test this delicious cake and enjoy! The family sure loved this one. It is definitely a keeper! 

Love it? Hate it? Want to make it? Let me know what you think with a comment below!
As always...

Bon appétit!